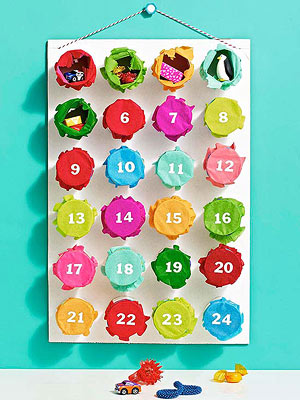
It’s that time of year again, the festive lights are being switched on in events up and down the country, the heart warming adverts are appearing on the television, the cheesy songs can be heard on the radio. It can only mean one thing… Christmas is coming!!
Marking the countdown to Christmas day with an advent calendar is a tradition that many of us look forward to as we approach the 1st December (myself included!). Opening one of the 24 doors each day and seeing what treat is inside offers children a little taste of the excitement that opening presents brings! It also helps us to count down the days until we can celebrate Christmas day with our loved ones. We therefore thought it would be a great idea to show you how your children can make their own advent calendar, which is easy to make, looks super cool and will get them (and you!) well and truly into the Christmas spirit 🙂
All you need is:
1. A 10 by 15 inch piece of cardboard
2. 12 toilet paper tubes
3. 9 different coloured tissue papers
4. 24 rubber bands
5. 24 treats of your choice
6. 24 number stickers (optional)
7. White poster paint
8. Scissors
9. PVA glue
Instructions:
1. For the base, cut a 10 by 15 inch piece of cardboard.
2. Cut 12 toilet paper tubes in half.
3. Paint the tubes and the base white.
4. Dip the bottoms of the tubes in glue and place them on the base in a grid, leaving about a half inch of space between them. Let the glue dry (if they don’t seem to be sticking well, you could always make a series of small cuts round the bottom of the tube before applying the glue, so you can fan out the bottom onto the cardboard base).
5. Cut tissue paper into 48 (3 1/2-inch) circles.
6. Inside each tube, place a treat, then lay two tissue paper circles over the top of the tube.
7. Stretch a small rubber band over the tissue paper and the tube so that the paper is taut.
8. Add number stickers to the tissue paper, or write the numbers on top with a felt tip pen.
(Source:www.parents.com)
And if you’re not feeling in the mood for yet more paint and PVA (honestly, we get it, we won’t judge!) then we have a cheaty *ahem* quick and efficient alternative for you too…
Simply collect 24 socks (so 12 pairs). Fairly small ones are ideal for this as they look cute (plus you won’t set the expectations too high as to what’s inside them!). Perhaps you’ve still got some baby socks around that you never wanted to part with, or you may prefer to buy some festive ones. Last year Jo bought the socks in the photo in Emma’s size, so after Christmas nothing was wasted – they just went into the sock drawer (they’re not that Christmassy after all!), and then this year they will be called into action for the advent calendar again 🙂 Somehow the idea of hanging the childrens’ baby or toddler socks up each Christmas-time, even when they’re well and truly grown out of them, makes this homemade advent calendar even cuter!
You then need to find 24 little bits you can pop inside the socks (whether you wrap them up, and how high you want to hang the socks probably depends on your child’s age and curiosity levels!). When you’re buying for kids, finding 24 mini pressies isn’t as hard as it sounds – a few little chocs, hairclips, toy cars, party bag style pressies, pens, rubber stamps, and stickers don’t have to cost the earth and will feel like a veritable treasure trove of excitement to your little angels!
Finally, simply hang the socks either from the tree or a piece of string, ric-rac or ribbon. Normal clothes pegs will do the job nicely for this (you can always just write the date on the front), or for additional festive appeal this £3 pack from Hobbycraft is a bargain,
Don’t forget to take share your finished advent calendars with us on Facebook!


